by
Dr. William Leland
Las Cruces, NM USA
he great Josef Hofmann, who without question possessed one of
the three or four greatest piano techniques of all time, once wrote:
"Those pesky scales! Why must they always be so hard--in fact, the
hardest thing to do on the piano?"
If you have trouble with scales, you're in good company. Besides,
when you come right down to it, the human hand and the piano
keyboard are not very well suited to each other. The hand, with it's
marvelous "opposing thumb", is generally used as a unit, opening,
closing and shaping itself into countless configurations that grip,
hold, pull, turn, twist and manipulate things. But, on the piano
keyboard, we have to line up its five digits--of all different
lengths and strengths--on a flat plane, and use them independently
to strike and release little levers. And if that weren't enough,
we're supposed to do this over a distance of four feet, zipping back
and forth and making smooth connections between the positions.
|
 The
videos which accompany this article are in the Windows Media Player .WMV
format. To play them, just click on the link appropriate for your type of
connection (broadband or dial-up modem). If your browser pops up a security
message asking you what to do with the video file, choose to open it. This
will start the Windows Media Player (or other .WMV player on your system) in
a new window and play the file. The
videos which accompany this article are in the Windows Media Player .WMV
format. To play them, just click on the link appropriate for your type of
connection (broadband or dial-up modem). If your browser pops up a security
message asking you what to do with the video file, choose to open it. This
will start the Windows Media Player (or other .WMV player on your system) in
a new window and play the file.
|
It's pretty generally agreed that one of the most important areas
of good technique is the study of the major and minor scales. To be
sure, scales do not embody a complete kind of exercise--the fifth
fingers are used only at the ends of the white key scales, and in
the black key scales they're not used at all--nor would we recommend
them for the tiny hands of young beginners. But scales are important
for much more than their mechanical usefulness. Traditional Western
music has for more than four centuries been based on the major/minor
system of harmony: 24 keys, each with a tonal center. And the
building blocks for every one of these keys are the notes of its
diatonic scale, which provide the 'alphabet' for its chords and
melodies, just as the 26 letters serve to form all the words in the
English language. Learning scales means learning the basic language
of music, and it would be difficult to find any other technical
figuration that shows up more often in the traditional piano
literature.
Playing them well is another matter. To play a scale of even one
octave the hand must shift its position, and in countless scale
passages it has to shift two or more times. How do we make these
shifts smoothly, with no break, no unevenness of rhythm, and no
unintentional accents?
Controversy still rages over how best to do this. Should scales
be played with a thumb-under connection or with a quick shift of
hand position? Well, this question was settled--or should have
been--a long time ago by Otto Ortmann, whose exhaustive
investigations were recorded in his book, The Physiological Mechanics
of Piano Technique, published in 1929. Ortmann set up a scientific
laboratory at Peabody Conservatory in Baltimore, using elaborate
equipment that included tiny lights attached to the hands,
electrical sensors under the piano keys, and high speed photography;
his subjects for the experiments were professional concert pianists.
Ortmann found that smooth scale playing produces both kinds of
movement: the thumb does indeed pass under the hand, but not
necessarily all the way to the first note of the next position; the
remaining distance is covered by the hand shift. Moreover, the
technique varies somewhat with tempo: the quick shift assumes more
importance as the speed increases.
Two problems almost always arise at the beginning of scale
studies: the first is the initial placement of the hand. No less an
authority than Frederic Chopin recommended beginning with a scale
that has a lot of black keys, to give the thumb more room to
maneuver, but virtually everyone starts with C Major, one of the
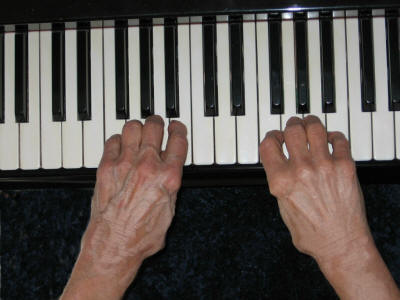
hardest scales to play well. So the thumb plunks straight down on
Middle C, and right away the hand is placed into a position that
makes it impossible for the thumb to reach its next note without
twisting the whole hand around:
The second problem involves the actual playing of the thumb.
Ortmann found that the major difficulty here was not moving the
thumb sideways, but making the keystroke with the thumb alone, while
it's under the hand; the natural tendency is to punch the note with
the arm instead:
With these difficulties in mind, it seems reasonable to assume
that the first thing to do in the study of scales is to practice
simple finger exercises that isolate the special movement of the
thumb, and place it in its proper positions.
First of all, in reaching under be sure that you move the whole
thumb from the third joint, which is located back at the wrist;
don't crook the nail joint. (A good way to get the feel of this is
to pinch a pencil in the crease that will arise at the base of the
palm.)
Then begin a simple exercise, using only the thumb and
forefinger: place the 2nd finger of each hand on the notes B and F,
respectively; then place the thumbs underneath
on the surfaces of A and G, without depressing. Note that in this
position the hands have to be somewhat 'pigeon-toed', that is,
pointed inward:
Now, try this five-step exercise:
Lightly tap the thumbs on their key surfaces, making
absolutely sure that they do their own work--no hand
dipping!
As this gets more comfortable, lightly play the two
thumb notes (A and G) together, again without moving the
hands either sideways or up and down.
Keeping the hands quiet, move the thumbs back and
forth by alternately tapping the surfaces of A and C
(left hand) and G and E (right hand). Note that the
thumbs will have to strike the C and E on an angle.
Repeat step three, but play the thumb notes instead
of tapping them.
Play all three notes back and forth, starting with
the thumbs underneath: A-B-C-B-A (left) together with
G-F-E-F-G (right). Nothing should move sideways but the
two thumbs.
Numerous variations of this exercise are possible, always
arranging the hands in mirror fashion and playing in contrary motion. For example, the
next logical step would be to practice with four notes in each
group, so as to pass the thumb under the third finger. After that,
one should also try figures using black keys; a comfortable mirror
figure might use part of A-flat Major in the left hand together with
E Major in the right:
To practice moving the thumb under the fourth finger, it's best
to begin with the pattern that's easiest to reach; this would be a
five-note section of the scale of G-flat Major, with both hands
using the notes F, G-flat, A-flat, B-flat and C-flat--but playing,
of course, in contrary motion. It's also wise here to move the thumb
under as the second finger plays, leaving it poised over it's next
note until time to play; this will help separate the sideways
movement from the downstroke:
These exercises employ both the proper hand positions and the
proper movements needed for smooth scale playing. The 'pigeon-toed'
angle of the hands is necessary to position the thumb correctly
without twisting, though the degree of angle will vary a little with
different keys. Keeping this slight angle constant will permit the
hands to move back and forth over the keyboard as if on a track, and
the forearms should move with them, keeping the same angle as far as
possible. Practicing these movements until they feel natural will go
a long way towards improving both scales and arpeggios. Illustrated
in Videos 6 are the scales of C major, D-flat major, and E major:
|
|